Archives

All posts for the month January, 2012

Ambrosia

Published January 28, 2012 by ciannucci

My favorite part of Easter brunch at my grandmother’s house was always her pierogi’s and her famous Ambrosia Salad for dessert. I attempted making my own Ambrosia the other day for a baby shower at work. It wasn’t the recipe she used but it sure did bring back memories.

Ambrosia

1 large package Cook and Serve vanilla pudding
1 large package orange jell-o
2 cups water
1 16 oz Cool-Whip (lite or fat-free is fine)
1/2 bag mini marshmallows
1 can pineapple tidbits (Any size, depending on your preference)
1 can mandarin oranges (Any size, depending on your preference)
2 bananas, sliced (Optional, put in before serving so they don’t turn brown in the fridge)

Mix together pudding, Jell-o, and water over medium heat until it boils. Remove from heat and pour into a large mixing bowl. Refrigerate until mixture has thickened (about an hour). Beat until creamy. Fold in Cool Whip, marshmallows, and fruit. Chill about an hour before serving.

Apple-Raisin Bread Pudding

Published January 25, 2012 by ciannucci

It’s cold out there. This is a great recipe for those nights when you’re cozying up with the blanket and remote. I made this for the Twisted Vine last week because my mom was coming in with some friends. She loves bread pudding so I figured I would make something that she would enjoy…after all, she’s the best!

Apple-Raisin Bread Pudding

Ingredients:

1 loaf of Raisin Bread (day old)

3 cups of sliced apples

7 eggs

3/4 cup sugar

1/2 cup milk

1 teaspoon vanilla

1 tablespoon butter

Glaze:

1 cup water

1 cup sugar

1/3 cup corn starch

1 tablespoon butter

1 teaspoon vanilla

Process:

1. Preheat oven to 325 degrees.

2. Slice bread into one inch chunks.

3. Slice apples into chunks as well.

4. Coat the bottom of a 8 x 9 inch baking pan with melted butter.

5. Mix together bread and apple chunks and lay over the buttered pan.


6. Mix eggs, sugar, milk, and vanilla.

7. Pour over bread and apples.

8. Bake in oven for about 45 minutes or until a toothpick comes out clean.


Glaze:

1. In a saucepan heat sugar, corn starch, and water over medium heat until boiling and thick.

2. Remove from heat and stir for 2 minutes.

3. Stir in butter and vanilla.

4. Pour over bread pudding by slice.

Serve warm!


Banana Bread/Muffins

Published January 17, 2012 by ciannucci

This post is dedicated to the lovely Liz Larson. Also known as Lizard, chicka wicka Liz Larson, or my favorite “Blizz.” Her  equally lovely mother requested a banana bread/muffin recipe and so here we go.

But wait, before I explain the recipe I have to share something with you all. Blizz and her mom Blizzard recently went to a cake decorating class at Carlos Bake Shop in NJ. They had a tour of the bakery, decorated their cakes with fondant and then cut the line at the bake shop to get some delicious treats. I have a bone to pick with Miss Blizz because she did not tell me about this until last week after she had already gone. Don’t you people know this is my DRREAAMMM????? Although she didn’t tell me immediately, I am still grateful that I now know. Because guess who is going to a cake decorating class for my birthday at Carlos Bake Shop?? MMEEE!!! (And mommy, of course) All thanks to Blizz, tipping me off to this amazing experience!

Okay, where were we? Oh yes. Banana Bread..or muffins. Whichever you prefer. 

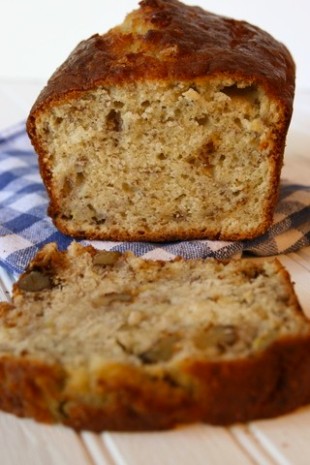
Now this bread is much more moist than any other banana bread you’ve had. Why, you ask? The secret ingredient….greek yogurt! You can use any kind of plain greek yogurt..Fage is my personal favorite. 

Greek Yogurt Banana Bread

Prep: 15 minutes
Cook: 55 minutes
 
Yield: 12 servings
Ingredients
2 cups all-purpose flour
1 cup sugar
3/4 teaspoon baking soda
1/2 teaspoon sea salt
1/4 cup butter, melted
2 large eggs
11/2 cups mashed ripe banana (about 3 bananas)
1 (6-ounce) container nonfat Greek yogurt (I used Fage)
1/2 cup chopped walnuts (optional)
1 teaspoon vanilla extract
1 Cooking spray
 
Preparation
1. Preheat oven to 350°F.

2. Lightly spoon flour into dry measuring cups; level with a knife. Combine flour, sugar, baking soda, salt, butter, eggs, bananas, yogurt, walnuts, if desired, and vanilla in a large bowl, mixing well. Pour batter into an 8 1/2 x 4 1/2-inch loaf pan coated with cooking spray. Bake at 350° for 55 minutes or until a wooden pick inserted in center comes out clean. Cool 10 minutes in pan on a wire rack; remove from pan. Cool completely on wire rack.


Image

Chocolate Peanut Butter Cake

Published January 16, 2012 by ciannucci

Last week I made a chocolate peanut butter cake for the Twisted Vine Restaurant. Out of everything I have made for the restaurant, this was by far my favorite. So here we go…

The chocolate cake portion came out extra moist and I think it’s because I tried a new recipe and added sour cream to the mixture.

Sour Cream-Chocolate Cake with Peanut Butter Frosting and Chocolate-Peanut Butter Glaze
Adapted, from SmittenKitten.com

This cake is INTENSE. Serve it in the thinnest slices possible, and keep a glass of milk handy.

Makes an 8-inch triple-layer cake; serves 12 to 16 (the book says, I say a heck of a lot more)

2 cups all-purpose flour
2 1/2 cups sugar
3/4 cup unsweetened cocoa powder, preferably Dutch process
2 teaspoons baking soda
1 teaspoon salt
1 cup neutral vegetable oil, such as canola, soybean or vegetable blend
1 cup sour cream
1 1/2 cups water
2 tablespoons distilled white vinegar
1 teaspoon vanilla extract
2 eggs

1/2 cup coarsely chopped peanut brittle (I skipped this)

1. Preheat the oven to 350 degrees F. Butter the bottoms and sides of three 8-inch round cakepans. Line the bottom of each pan with a round of parchment or waxed paper and butter the paper.

2. Sift the flour, sugar, cocoa powder, baking soda, and salt into a large bowl. Whisk to combine them well. Add the oil and sour cream and whisk to blend. Gradually beat in the water. Blend in the vinegar and vanilla. Whisk in the eggs and beat until well blended. Scrape down the sides of the bowl and be sure the batter is well mixed. Divide among the 3 prepared cake pans.

3. Bake for 30 to 35 minutes, or until a cake tester or wooden toothpick inserted in the center comes out almost clean. Let cool in the pans for about 20 minutes. Invert onto wire racks, carefully peel off the paper liners, and let cool completely. (Deb note: These cakes are very, very soft. I found them a lot easier to work with after firming them up in the freezer for 30 minutes. They’ll defrost quickly once assembled. You’ll be glad you did this, trust me.)

4. To frost the cake, place one layer, flat side up, on a cake stand or large serving plate. Spread 2/3 cup cup of the Peanut Butter Frosting evenly over the top. Repeat with the next layer (which is the cheesecake layer) Place the last layer on top and frost the top and sides of the cake with the remaining frosting.
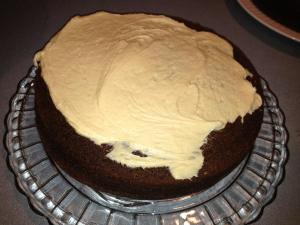
5. To decorate with the Chocolate–Peanut Butter Glaze, put the cake plate on a large baking sheet to catch any drips. Simply pour the glaze over the top of the cake, and using an offset spatula, spread it evenly over the top just to the edges so that it runs down the sides of the cake in long drips. Refrigerate, uncovered, for at least 30 minutes to allow the glaze and frosting to set completely. Remove about 1 hour before serving. Decorate the top with chopped peanut brittle.

Peanut Butter Cheesecake

  • 2 8 ounce packages cream cheese, softened
  • 1 cup white sugar
  • 1/2 cup creamy peanut butter
  • 3 tablespoons all-purpose flour
  • 4 eggs
  • 1/2 cup milk (I used 1%, but 2% or whole milk would be great too)
  1. Bake the cheesecake one day in advance so that it has plenty of time to chill in the fridge before layering with the chocolate cake!
  2. Preheat oven to 325 degrees.
  3. Beat together the cream cheese, peanut butter, sugar, and flour until light and smooth and creamy. Beat in the eggs one at a time. Stir in the milk.
  4. Grease a 9-inch round springform pan VERY WELL. There is no crust on this cheesecake, so it is imperative that you really grease the pan so that the cheesecake will release from it easily.
  5. Pour batter into the greased pan.
  6. Bake for 10 minutes at 325 degrees.
  7. Reduce heat to 260 and bake for 50 minutes or until just the center is slightly jiggly.
  8. Cool on the counter for 2 hours. Transfer to a refrigerator to chill overnight.

Peanut Butter Frosting

Makes about 5 cups

10 ounces cream cheese, at room temperature
1 stick (4 ounces) unsalted butter, at room temperature
5 cups confectioners’ sugar, sifted2/3 cup smooth peanut butter, preferably a commercial brand (because oil doesn’t separate out)

1. In a large bowl with an electric mixer, beat the cream cheese and butter until light and fluffy. Gradually add the confectioners’ sugar 1 cup at a time, mixing thoroughly after each addition and scraping down the sides of the bowl often. Continue to beat on medium speed until light and fluffy, 3 to 4 minutes.

2. Add the peanut butter and beat until thoroughly blended.

Chocolate-Peanut Butter GlazeMakes about 1 1/2 cups

8 ounces semisweet chocolate, coarsely chopped
3 tablespoons smooth peanut butter
2 tablespoons light corn syrup
1/2 cup half-and-half

1. In the top of a double boiler or in a bowl set over simmering water, combine the chocolate, peanut butter, and corn syrup. Cook, whisking often, until the chocolate is melted and the mixture is smooth.

2. Remove from the heat and whisk in the half-and-half, beating until smooth. Use while still warm.


Recipe for Friendship….Then, Dark Chocolate Peanut Butter Sandwiches

Published January 13, 2012 by ciannucci

For once, I am going to write. Don’t worry I’ll leave you a recipe but here are some thoughts today…

Ever just play around while baking or cooking? When I am baking I usually have my music playing and I dance around the kitchen. Baking has definitely become my stress-reliever, if you will. Whenever I am feeling anxious I have learned to turn to baking to calm down and clear my head. There is something about the aroma of melting chocolate floating through my house that puts a smile on my face. It’s that warm, cozy feeling. The kind you have when you are wrapped up in a warm blanket with a cup of tea, watching a movie while the snow is falling outside. There’s nothing else like that feeling. Relaxed, at peace…..happy. A feeling we would all like to feel more of.

I decided in college that happiness was a choice. You can choose to be happy with everything wonderful in your life, or you could choose to harp on the negative feelings. I had some friendships that caused me to feel pressure, stress, and tension. You know the kind of people that you tiptoe around because you’re afraid to break their mood? Yeah that was me….tiptoeing. Then I woke up and realized…what is the point of bending over backwards to make someone else happy? My job is to make MYSELF happy. Sounds selfish but in the end YOU are the person who is going to be left unhappy after trying to juggle the happiness of others.

That leads me to another thought…I truly don’t understand jealousy. Like, I know what it feels like to want something someone else has. But true jealousy…the envious kind. I really don’t understand it. For example, my best friends in college and I were all education majors. We all graduated and immediately started long-term sub positions. This summer we all worked our butts off to get a full time job. Out of the five of us…two landed full time jobs. I have never felt so happy for these two girls…it was almost as if I was experiencing it because we are that close. Never once did jealousy cross my mind. YES, I wanted a job more than anything in the world…but so did they and we all deserved it. There wasn’t enough to go around. My friends mean everything to me and if I acted jealous or envious what kind of friend would I be? These are smart, talented, hard-working teachers who are going to make a huge difference in kids lives. What is there to be jealous of? My time will come…and my friends will be just as happy for me. That’s what friendship is about. I now know what TRUE friendship is. It’s being genuinely happy for your friend when something goes there way…even if it’s what you wanted all along.

My mom always tells me to surround yourself with people who empower you. It’s so true. I build my friends up, they build me up. They also tell me when I am being ridiculous, because they can. I trust them and understand them. True friendship is also about being yourself. Sam taught me this. Sam is the kind of friend who will listen to me complain for hours and then ask if there is anything else i need to talk about. We are almost the same person. We both prefer to sit on the couch with some oreos rather than  go to a bar. We laugh..we cry…we whine about how fat we are. She gets me…and I get her. And you know how else I know she is a true friend? We are both genuinely happy for each other when something goes our way.

Think about your friends. Ask yourself if you can TRULY be yourself around each one of them. If your questionable…it might not be a true friend.

College taught me a lot more than differentiation, lesson plans, meeting the needs of all learners, various instructional strategies, print-rich environments, data data data, assessments, and the occasional horse and pony show..

It taught me about true friendship.

Don’t get me wrong…I have some true friends from home that I love to pieces..pheen, kim, cheryl…(you guys are my home)

And the past year has brought new friendships from work that I am sure will last a lifetime..

So that being said….value your friendships. Be happy for your friends. They love you.

Last night I made these for those smart, talented, hard-working girls I mentioned earlier…those teachers.

Dark Chocolate Peanut Butter Sandwiches

1 bag of peanut butter cookies…you know, the betty crocker kind.

Mix oil, water, and cookie mix.

Press batter into a 14×9 inch cake pan

Bake for 8 minutes at 350 degrees.

Pull out of oven and pour over dark chocolate chips

When chips start to melt, take a knife and spread them over the giant cookie.

When somewhat cooled (not all the way) cut into long strips vertically and then horizontally.

Take one square and make a sandwich out of it by placing it chocolate side down onto another square cookie.

Keep doing this until you have lots of chocolate cookie sandwiches!


Double chocolate surprise brownies

Published January 10, 2012 by ciannucci

I have to admit, I don’t succeed at every recipe. Often times I fail actually. For example, a few weeks ago I made a red velvet cake that turned out AWFUL and ended in the trash. It happens. We can’t win em all.

Now there is this brownie recipe…and it’s ALWAYS a success. In fact, I made it for my brother to take to a party and they were gone in seconds.

Now, I always give credit where credit is due. Today the credit shall be given to my favorite Uncle Marc who always appreciates the love I put into my desserts. So, I give him credit for these OUTSTANDING brownies. He gives me credit for the weight he has gained this holiday season. Fair enough.

Uncle Marc makes these brownies for work and people always ask him the secret recipe. He never divulges. For me? Well, I am his favorite niece…

Here it is…

YEAH RIGHT! Did you actually think I was going to share our secret? So sorry…but some things are better left up to the imagination. Besides, I can’t share ALL of my secrets. This one is better kept between my Uncle Marc and I. Trust me, you don’t want to know the recipe because your size 6’s will quickly turn into 10’s.

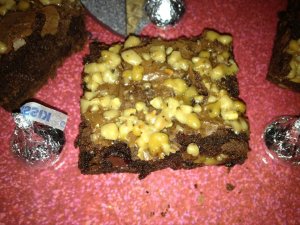
Therefore, I leave you with a picture of the incredible brownie. It’s the best one you’ll ever have. What’s in it? You’ll never know.


Caitlin’s Coconut Cloud Cake

Published January 9, 2012 by ciannucci

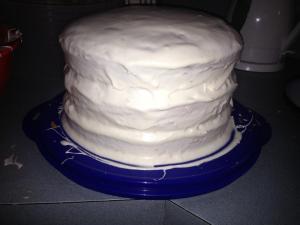
So just imagine if Angels made food. (Thanks, Ry ;)) This cloud cake is HEAVENLY. I made it triple layered…you can make it however many layers you wish. I found that three layers were a bit much seeing as the egg whites make it rise higher than a typical cake. It ended up being a bit hard to cut and serve so next time I might just stick to two layers.

You can make a homemade cake or use the box…the homemade is preferred..the box is easier.

Caitlin’s Coconut Cloud Cake

Cake Ingredients:

1 box of duncan hines White cake mix

3 egg whites

1 1/4 cup water

1/3 cup oil

coconut extract

Buttercream Frosting Ingredients:

1 jar of fluff (yup!)

1 stick of butter

4 cups confectionary sugar

1 bag of shredded coconut

coconut extract

1. Grease and flour 2 9×9 inch circular cake pans.

2.  Beat cake mix, egg whites, water, oil, and coconut extract until well blended.

3. Pour batter evenly between two cake pans.

4. Bake for 25 minutes at 325 degrees.

While cake is baking…make frosting.

With a hand mixer, mix fluff, butter, confectionary sugar, and coconut extract. The frosting should be thick and not runny.

When cake is done, let cool for at least an hour.

Frost the first cake with the buttercream and add shredded coconut on top.

Take the second cake and gently place it on top. Continue to frost the rest of the cake with the leftover frosting. Cover entire cake with shredded coconut.

Now If you are a fan of coconut but ALSO a fan of LEMON you may like this better:

Instead of using the buttercream frosting in between the cakes, spread a layer of lemon filling in the middle of the cake for Caitlin’s Coconut Cloud Lemon Cake!